Quick Fire Emission Dataset (QFED): Difference between revisions
No edit summary |
|||
| (One intermediate revision by the same user not shown) | |||
| Line 1: | Line 1: | ||
{{rightTOC}} | {{rightTOC}} | ||
This page to contains information regarding QFED, mostly for developers. | This page to contains information regarding QFED, mostly for developers and NCCS users. | ||
== How to Check Out and Build the Code == | == How to Check Out and Build the Code == | ||
| Line 7: | Line 7: | ||
These are checkout and build instructions for QFED. We presume that the user has an account and appropriate permissions on '''progress''' to check code out, and access to the NCCS machines (e.g., '''discover''') to run code. | These are checkout and build instructions for QFED. We presume that the user has an account and appropriate permissions on '''progress''' to check code out, and access to the NCCS machines (e.g., '''discover''') to run code. | ||
The name of the module in the cvs repository is '''QFED'''. | The name of the module in the cvs repository is '''QFED'''. The curent stable tag is '''qfed-1_0_r5'''. The QFED source can be checked out into the directory ''${HOME}/projects/qfed/src'' with the following command | ||
% cvs -d $CVSROOT co -d | % cvs -d $CVSROOT co -d ${HOME}/projects/qfed/src -r qfed-1_0_r5 QFED | ||
Once the code is checked out set the '''ESMADIR''' variable to point to the QFED | Once the code is checked out set the '''ESMADIR''' variable to point to the parent QFED source directory, e.g.: | ||
% setenv ESMADIR ${HOME}/projects/qfed | % setenv ESMADIR ${HOME}/projects/qfed | ||
Make sure that you have a valid ${BASEDIR}. | Make sure that you have a valid ${BASEDIR}. The qfed-1_0_r5 tag compiles successfully against Baselibs-v3.2.0 and Baselibs-v3.2.1. | ||
To build the code navigate to the source directory where the main GNUMakefile resides: | To build the code navigate to the source directory where the main GNUMakefile resides: | ||
% cd | % cd ${HOME}/projects/qfed/src | ||
The available options can be seen by running gmake or '''gmake esma_help''': | The available build options can be seen by running gmake or '''gmake esma_help''': | ||
% gmake esma_help | % gmake esma_help | ||
| Line 33: | Line 33: | ||
Environment: | Environment: | ||
ESMADIR = ''.../qfed/src/'' | ESMADIR = ''.../qfed/src/'' | ||
BASEDIR = /opt/Baselibs/v3.1 | BASEDIR = /opt/Baselibs/v3.2.1/ | ||
ARCH = Linux | ARCH = Linux | ||
SITE = ''hostname'' | SITE = ''hostname'' | ||
| Line 46: | Line 46: | ||
% make PYTHON_INSTALL=python_install install | % make PYTHON_INSTALL=python_install install | ||
It is safe to directly request building the QFED python modules skipping the intermediate build step. | |||
To build and run QFED on discover you might need to change the default python interpreter with Python-2.5.4 for example. Additionally f2py and pyhdf are needed to build and run QFED. For details how to setup your environment on discover refer to section 4. | |||
== QFED Vegetation Map == | == QFED Vegetation Map == | ||
| Line 73: | Line 76: | ||
There are two Level 3 (Global Gridded) QFED products: | There are two Level 3 (Global Gridded) QFED products: | ||
# The daily fire radiative power (FRP) derived from MODIS Thermal Anomalies/Fire products (MOD14, MYD14). The name of the product is QFED Level 3a. | # The daily fire radiative power (FRP) derived from MODIS Thermal Anomalies/Fire products (MOD14, MYD14). The name of the product is QFED Level 3a. | ||
# The Level 3b product is derived from the Level 3a product. It contains the daily QFED fire emissions (BC, OC, CO, CO2, SO2). | # The Level 3b product is derived from the Level 3a product. It contains the daily QFED fire emissions (BC, OC, CO, CO2, SO2, PM25). | ||
The QFED Level 3a product can be generated after obtaining the necessary MOD14 and/or MYD14 granules using the '''qfed_l3a.py''' script. Similarly, Level 3b can be generated using the '''qfed_l3b.py''' script. Typical usage of the scripts | The QFED Level 3a product can be generated after obtaining the necessary MOD14 and/or MYD14 granules using the '''qfed_l3a.py''' script. Similarly, Level 3b can be generated using the '''qfed_l3b.py''' script. Typical usage of the scripts requires one to provide the date in terms of year a day of the year. Several consecutive days can be processed by additionally specifying end day of the year. For full list of options run the scripts with the '--help' option, e.g. | ||
% qfed_l3a.py --help | % qfed_l3a.py --help | ||
== Running QFED | == Running QFED == | ||
QFED has been successfully build and run on discover using | Here we will show how to setup the environment to build and run QFED on discover. QFED has been successfully build and run on discover using with Python-2.5.4, pyhdf-0.8.3, Baselibs-3.2.1 and Intel-11.0.083 compiler. First, lets set some environmental variables: | ||
# load intel and MPI modules | |||
module purge | |||
module load comp/intel-11.0.083 | |||
module load other/mpi/mvapich2-1.4.1/intel-11.0.083 | |||
# QFED installation directory | # QFED installation directory | ||
Latest revision as of 05:30, 23 September 2010
This page to contains information regarding QFED, mostly for developers and NCCS users.
How to Check Out and Build the Code
These are checkout and build instructions for QFED. We presume that the user has an account and appropriate permissions on progress to check code out, and access to the NCCS machines (e.g., discover) to run code.
The name of the module in the cvs repository is QFED. The curent stable tag is qfed-1_0_r5. The QFED source can be checked out into the directory ${HOME}/projects/qfed/src with the following command
% cvs -d $CVSROOT co -d ${HOME}/projects/qfed/src -r qfed-1_0_r5 QFED
Once the code is checked out set the ESMADIR variable to point to the parent QFED source directory, e.g.:
% setenv ESMADIR ${HOME}/projects/qfed
Make sure that you have a valid ${BASEDIR}. The qfed-1_0_r5 tag compiles successfully against Baselibs-v3.2.0 and Baselibs-v3.2.1.
To build the code navigate to the source directory where the main GNUMakefile resides:
% cd ${HOME}/projects/qfed/src
The available build options can be seen by running gmake or gmake esma_help:
% gmake esma_help
  Standard ESMA targets:
  % make esma_install    (builds and install under ESMADIR)
  % make esma_clean      (removes deliverables: *.[aox], etc)
  % make esma_distclean  (leaves in the same state as cvs co)
  % make esma_doc        (generates PDF, installs under ESMADIR)
  % make esma_help       (this message)
  Environment:
     ESMADIR = .../qfed/src/
     BASEDIR = /opt/Baselibs/v3.2.1/
        ARCH = Linux
        SITE = hostname
To build and install QFED :
% make esma_install
followed by
% make PYTHON_INSTALL=python_install install
It is safe to directly request building the QFED python modules skipping the intermediate build step.
To build and run QFED on discover you might need to change the default python interpreter with Python-2.5.4 for example. Additionally f2py and pyhdf are needed to build and run QFED. For details how to setup your environment on discover refer to section 4.
QFED Vegetation Map
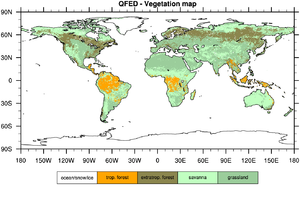
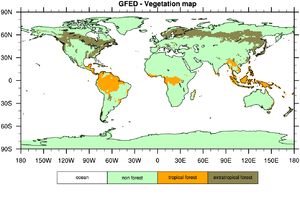
The QFED vegetation classes are Tropical Forest, Extratropical Forest, Savanna and Grassland. The QFED vegetation map is derived from the global IGBP land cover data set by aggregating one or more IGBP classes into a single QFED class. QFED Tropical Forest corresponds to IGBP Evergreen Broadleaf for latitudes (30°S, 30°N), whereas QFED Extratropical Forest includes the rest of the IGBP forest types and IGBP Evergreen Broadleaf for latitudes outside the (30°S, 30°N) zone. The IGBP shrubland and savanna classes are aggregated into the QFED Savanna class. Similarly, the IGBP grassland and cropland classes are aggregated into the QFED Grassland class.
 |
 |
The QFED vegetation map uses the following numerical values for the vegetation classes:
Tropical Forest = 1
Extratropical Forest = 2
Savanna = 3
Grassland = 4
To generate a QFED vegetation map and save it as a NetCDF file one can use the VegType.py script, which is installed in $(ESMADIR)/$(ARCH)/lib/Python/qfed/. The default options are equivalent to running the script with the following arguments:
VegType.py --resolution='c' --output='QFED.vegetation_map.x288_y181.2010.nc'
The available options and their description can be seen by running the script with '-h' or '--help' option.
QFED Level 3 Products
There are two Level 3 (Global Gridded) QFED products:
- The daily fire radiative power (FRP) derived from MODIS Thermal Anomalies/Fire products (MOD14, MYD14). The name of the product is QFED Level 3a.
- The Level 3b product is derived from the Level 3a product. It contains the daily QFED fire emissions (BC, OC, CO, CO2, SO2, PM25).
The QFED Level 3a product can be generated after obtaining the necessary MOD14 and/or MYD14 granules using the qfed_l3a.py script. Similarly, Level 3b can be generated using the qfed_l3b.py script. Typical usage of the scripts requires one to provide the date in terms of year a day of the year. Several consecutive days can be processed by additionally specifying end day of the year. For full list of options run the scripts with the '--help' option, e.g.
% qfed_l3a.py --help
Running QFED
Here we will show how to setup the environment to build and run QFED on discover. QFED has been successfully build and run on discover using with Python-2.5.4, pyhdf-0.8.3, Baselibs-3.2.1 and Intel-11.0.083 compiler. First, lets set some environmental variables:
# load intel and MPI modules
module purge
module load comp/intel-11.0.083
module load other/mpi/mvapich2-1.4.1/intel-11.0.083
# QFED installation directory
set QFED = ${HOME}/qfed/Linux/

# pyhdf - python interface to the HDF library
set PYHDF = '/usr/local/other/pyhdf/0.8.3/'

# IGBP-INPE dataset
set QFED_IGBP = '/discover/nobackup/rgovinda/Emissions/Vegetation/GL_IGBP_INPE/'

# MODIS Fire products
set MODIS_FIRE = '/discover/nobackup/dao_ops/intermediate/flk/modis/'

# QFED Level3a and Level3 output directories
set QFED_L3a = ${HOME}/tmp/QFED-test/
set QFED_L3b = ${HOME}/tmp/QFED-test/

# QFED scripts and n4zip utility
setenv PATH ${QFED}/bin/:${SHARE}/dasilva/bin/:${PATH}

# QFED and pyhdf python modules
setenv PYTHONPATH ${QFED}/lib/Python/:${PYHDF}/lib/python2.5/site-packages/:${PYTHONPATH}
To generate the QFED FRP (QFED-L3a) files for July 19, 2010 (DOY = 200) using both MODIS Aqua and Terra data, we will execute the qfed_l3a.py script, e.g.
qfed_l3a.py --mxd14=${MODIS_FIRE} --mxd03=${MODIS_FIRE} --igbp=${QFED_IGBP} --output=${QFED_L3a} 2010 200
Next we will generate the actual emissions files for the same day by running the qfed_l3b.py script
qfed_l3b.py --input=${QFED_L3a} --output=${QFED_L3b} --ndays=1 2010 200